How To Use Sensibo With HomeKit
When you buy through links in this article, I may earn an affiliate commission. Learn More.
The smart AC controllers from Sensibo can provide not only remote control of your heating and cooling, but some automation smarts through integration with your smart home.
Using Apple’s HomeKit platform allows you to use the sensors on your Sensibo device in the same way as other HomeKit sensors, gain voice control with Siri, and make settings changes to your AC via HomeKit automations.
There are some good HomeKit thermostats available, but I only have split system air conditioners. To manage my home’s climate holistically through HomeKit I needed a way to hook up my Sensibo Sky controllers.
Does Sensibo work with HomeKit?
Sensibo Smart AC controllers do indeed work with HomeKit. In fact, there are two ways to get Sensibo devices working with HomeKit, depending on which devices you have.
Use native HomeKit pairing on a Sensibo Air device.
Use a Homebridge server with the Sensibo plugin for any Sensibo Device.
The Newer Sensibo Air models support HomeKit natively, but there are still reasons you might go for the DIY method in option 2.
This DIY method can be used with older Sensibo Sky models that don’t officially support Apple’s HomeKit. Sensibo has themselves endorsed this method for those devices, but it can be used with newer Sensibo Air models as well.
This HomeBridge solution not only did the job, but works super well and offers a lot of configuration options to customize how your HomeKit setup looks above and beyond what the native integration provides.
Upgrading to a newer model is going to be the easiest option, though, if you don’t want to get your hands dirty with third-party utilities. Going this route means you simply need to pair the Sensibo device with HomeKit using the normal pairing QR code. You’ll find this on the bottom of the device, and in the Sensibo app under the device > gear icon > Apple HomeKit.
What Sensibo Features Does HomeKit Support?
HomeKit natively supports the essential thermostat functions of setting the desired temperature and whether you want heating or cooling. It will also show the current temperate as read with the device, and the Humidity, but only if you drill into the accessory settings.
Sensibo devices have a lot more to them and using the Homebridge plugin presents those additional features in a way HomeKit understands. So you’ll not only get a thermostat accessory, but you can choose various additional controls in your configuration to be presented in HomeKit such as a separate humidity sensor, fan control, and various other useful buttons and switches.
|
Native Pairing
|
Homebridge
|
|
|---|---|---|
| Set Temperature | ||
| Set Temperature | ||
| Set Mode | ||
| Set Mode | ||
| Temperature Sensor | ||
| Temperature Sensor | Raw | Calibrated |
| Humidity Sensor | ||
| Humidity Sensor | Raw | Calibrated |
| Fan Control | ||
| Fan Control | ||
| Dry Switch | ||
| Dry Switch | ||
| Swing On/Off | ||
| Swing On/Off | ||
| Occupany Sensor | ||
| Occupany Sensor | ||
| Sync Button | ||
| Sync Button | ||
| Climate React On/Off | ||
| Climate React On/Off | ||
| Filter Indicator | ||
| Filter Indicator | ||
These features are all optional and can be hidden if you wish to keep things simple. As with other HomeKit accessories that support multiple functions, you can leave them grouped or split them out so they show separately. They’ll all remain available to Siri whether they are grouped or not.
The plugin presents the thermostat functions correctly as a thermostat type device, so Siri will be able to understand a variety of phrasings and correctly understand what you’re talking about. You can, for example, refer to the Sensibo as an ‘AC’ whether that is in the accessory name or not.
Using these virtual accessories, you’ll be able to specify the target temperature, the AC mode (Off, Heat, Cool, or Auto), and the fan speed (0-100%). The temperature and humidity sensors will also display in your home status at all times, and can be queried by Siri, and use those values in automation rules as well.
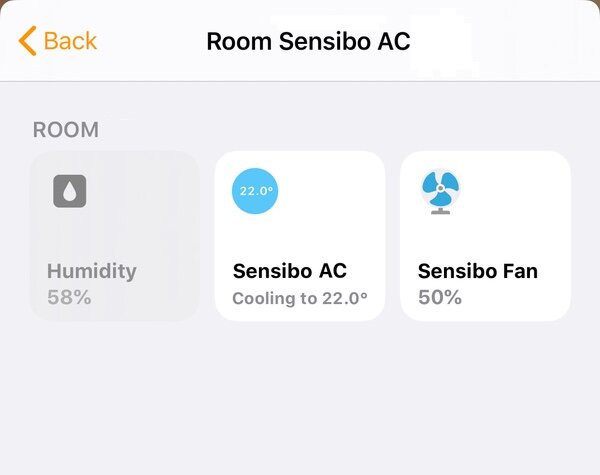
Example Homebridge Sensibo Tiles in the Home app
What You’ll Need
Apart from having a Sensibo Sky setup and working, you’ll also need to have HomeBridge set up and connected to your HomeKit Home. HomeBridge is a free open-source application that supports a whole stack of third party plug-ins to add unsupported devices to HomeKit.
In the past setting this up and running this system needed some good Linux knowledge and a suitable server to host it on. Now things are a lot easier thanks to the HOOBS project. Using their pre-built system image you can easily set up a Homebridge server in a few easy steps.
Running this on a Raspberry Pi or similar mini computer is the best option as it will effectively be like any other smart hub, small and low power that you can set and forget somewhere out of the way.
Once you have HOOBS in place, you just need to add the Sensibo plugin through the easy-to-use web interface.
Setting Up The Plugin
From the HOOBS dashboard:
Click on the Plugin icon on the toolbar and search for the word ‘sensibo’. You’ll want to choose the first result, Sensibo Ac.
Click on the Install button.
You can create a new bridge to run this plugin on, or use an existing one from those listed. Create a new bridge is the default as it’s better for reliability.
Once the target bridge is decided, click the Install button.
5. Once installed, you’ll see the plugin configuration page where you can configure various options for how you want your Sensibo devices to be displayed in HomeKit. You’ll need to choose an authentication method. Using your Sensibo account login details is the default, but you may want to use an API-key for better security.
You can have multiple keys for different uses, which is good in the event you need to revoke one service without breaking any others you may be using. You’ll need to generate a key to be used for HomeBridge. In the text box at the bottom enter a name for the key, like HomeBridge, and click Add API Key. Copy the long strings of letters that gets created into the API Key field of the HOOBS plugin.
You can leave the other options as-is and just click Save on the left. HOOBS will restart the bridge and you should have your Sensibo devices now visible in the Home app.
Optional Values
While just the API key well get you up and running with default values, you may want to adjust how things work in HomeKit, and this plugin offers a number of optional settings you can add on the configuration page in HOOBS.
By default, you’ll get a couple of extra accessories along with the AC, a Fan accessory and a dehumidifier. The later is a representation of the Dry mode you’re AC may have and allows you to activate that setting.
Additionally, you can opt to separate Humidity from the AC device as a separate sensor, add a button to Sync the AC state for you if it gets out of whack (similar to the Sensibo app), a Climate React toggle switch, and even an Occupancy sensor based on Sensibo’s geopresence functions.
All of these are simply Yes/No options in the HOOBS configuration page and are fairly self-explanatory. Just remember to click Save Changes afterwards.
In Summary
By making a modest investment in a Homebridge setup you can leverage all the features of your Sensibo Sky device in HomeKit, use it as sensor input for automation rules, and set your AC controls by Siri voice commands, as well being able to ask for the temperature, humidity and settings of the device.
While scheduled rules and geofenced operations are supported in the Sensibo App, being able to manage this all from the Apple Home app along with your other HomeKit devices is far more convenient and avoids you needing to wrangle with account sharing and multiple Sensibo accounts for other household members.
I’ve also found the Sensibo geofencing to be a little flaky when working with multiple people, so switching that to HomeKit has been a bonus. Of course, on top of those features, you’ll be able to include AC control in your scenes and automate operations in conjunction with other devices and sensor inputs through HomeKit’s automation rules.
I’ve been using this solution for a few years, and it’s been rock solid, and definitely worth the effort to perform the initial setup.