Eve Outdoor Cam Review: The Best Outdoor HomeKit Cam?
When you buy through links in this article, I may earn an affiliate commission. Learn More.
Good outdoor security coverage is something I’ve been focused on since we had a break-in a few years back. The nature of the front of my property also makes it pretty important since we have no visibility from inside the house due to a large perimeter wall, and I prefer to have my cameras in HomeKit for a better guarantee of privacy. The options here are pretty limited so when the Eve Outdoor Cam hit the market I was very interested to see how it would fare.
It took a bit more effort to install and test due to the requirement for hard-wiring, but that also makes the included floodlight much more compelling, and only the second HomeKit-compatible camera to have one. It also provides a far better experience than the battery powered EufyCam options I had been using to date.
The Eve Outdoor Cam has impressed me with fast response, clear video and audio capture, good night vision performance, and excellent build quality. It’s held up to the quality standards of my previous favorite, the Logitech Circle View, while not being plagued with its odd response dropouts, and it’s held up under the full brunt of rain and sun in a completely exposed location.
This is now my clear favorite for HomeKit outdoor coverage where I’m going to need to run cable anyway. It would be an even easier choice if you already had electrical wiring where you need it. You just need to keep in mind the mounting position given some limitations with the bracket. Let’s take a look at the details.
The Good
✔ Clear, sharp video and audio capture✔ Large HomeKit controllable flood light
✔ Fast, reliable response
The Bad
✘ Install can be a bit tricky✘ Mount has limited pitch angle
✘ 2.4GHz Wi-Fi only
The Eve Outdoor Cam is designed to replace an existing security light and must be wired into your home’s electrical system. This permanent power supply means you can use the built-in LED light panel as a regular light in HomeKit, and also ensures fast recording response from the camera, complete with pre-roll recording.
Pre-roll is common (but not guaranteed) on HomeKit Secure Video cameras in general and is a great feature to have as it means the video clip starts before the motion event triggered the camera. Coupled with HomeKit’s default behavior of recording until all motion stops this means that you get the complete event recorded from start to finish.
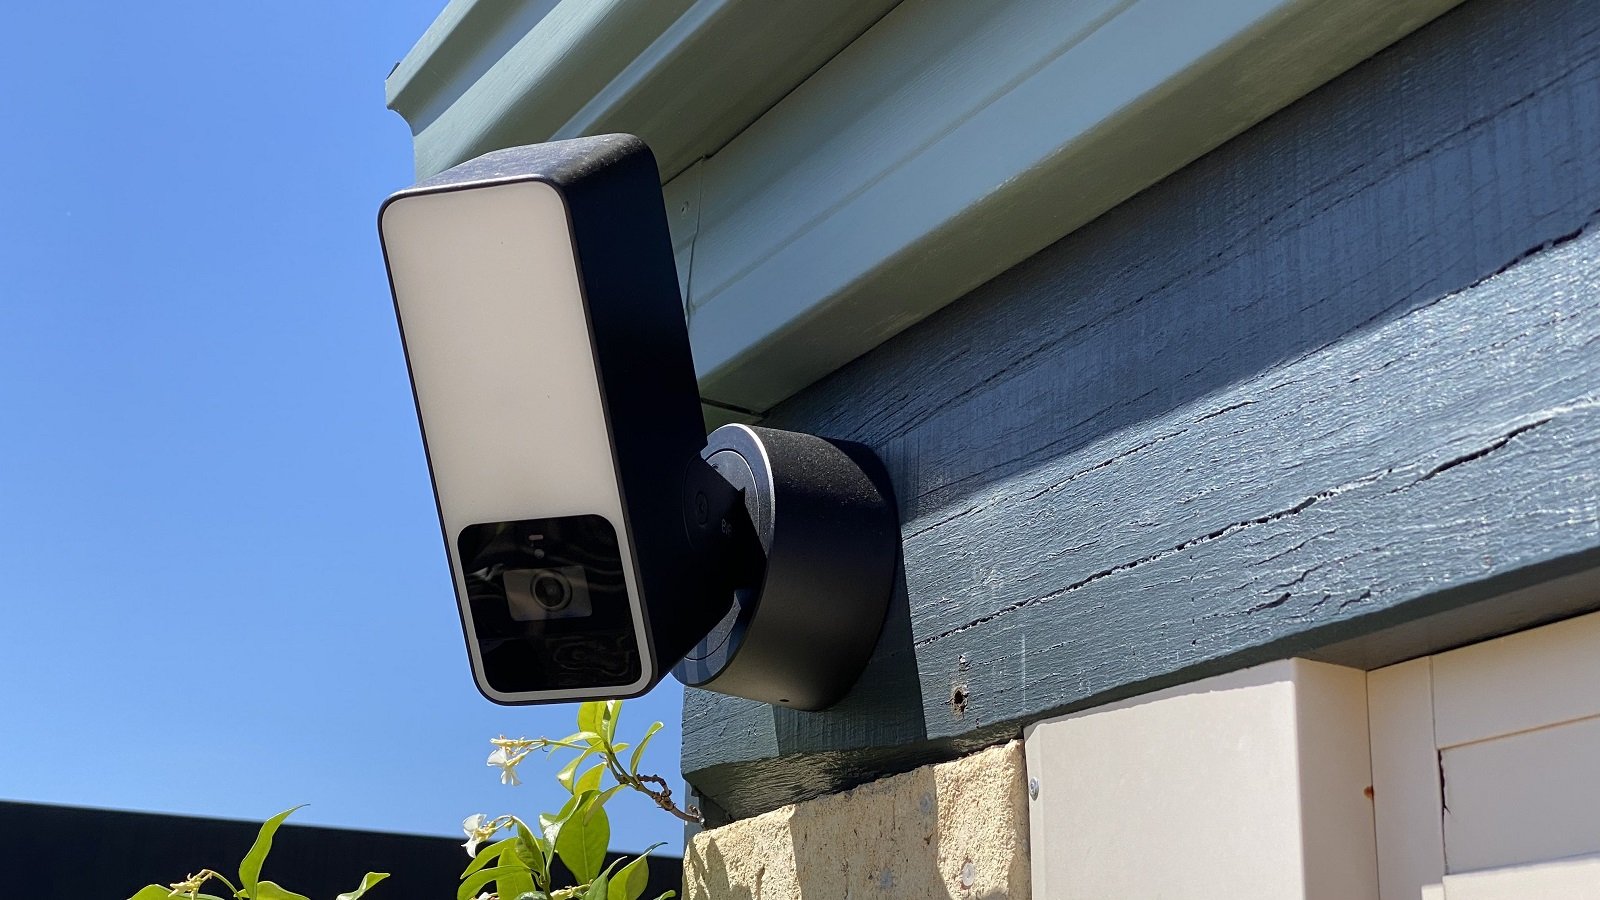
In the box you get all the various pieces of the solid - if somewhat complicated - mounting bracket, fixings, good quality wire connectors (my electrician said so), and amazingly, a clear and comprehensive installation manual. The camera itself is larger than I expected and has a significant heft to it that belies a solid construction, also attested to by its solid aluminium casing. Eve has rated the camera to IP55 weather resistance, which is plenty for an elevated mounting situation.
The front is obviously dominated by the LED light panel, with the camera, IR LEDs, microphone and motion sensor neatly housed below. When off, the light panel presents a smooth white surface, but when on the individual LEDs in the matrix are visible - not unusual for this type of light diffuser and brightness.
The camera itself is limited to the HomeKit mandated 1080p resolution and is a standard 16:9 aspect ratio with a 157-degree field of view. That allows good coverage of a wide area for outdoor use and means it can be placed effectively in a wider range of locations than just a corner.

Ring Spotlight Cam size comparison

Passive cooling vents on the rear
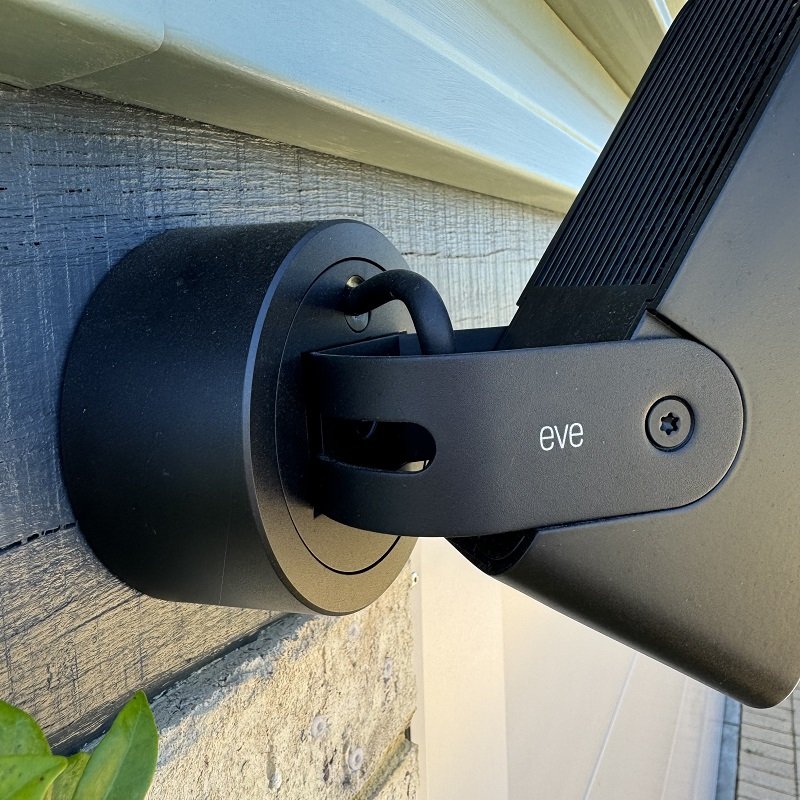
The three-axis mounting bracket
Installation and Setup
The first thing I had to deal with was getting new electrical wiring to the install location. I’d previously relied on battery/solar powered coverage at this location, so this necessitated getting an electrician. The Eve Outdoor Cam requires both neutral and ground for install, and the mounting bracket is certainly unique in its design. The actual attachment is via a U-bracket that is designed to fix directly to the wall, not a junction box. This was fine in my case as it was a completely new install, but if you have an existing electrical box you may need to replace it to suit.
Several pieces need to interlock, and the cable connections are housed inside the mount, so the cable feed to the camera itself must be routed through after the mount is installed. The outer part of the mount rotates to lock in place once you’re done. This looks intimidating at first glance, but the printed instructions are excellent, with clear diagrams for each step. For those inclined Eve also have an excellent video guide to show you how it’s done. My electrician had never seen one of these before but had no issues getting it installed first time.
The design of the mount allows for rotation up/down, left/right, and rotation for positioning the camera where you want. It’s worth noting that these are limited by the U-bracket that holds the camera. The horizontal angle is governed by the groove that mounting bolt passes through, while the downward angle is limited by the recess in the camera body where the U-bracket attaches. You can see in the photos above that I have hit the limit on this one, so you wouldn’t want to install it any higher than this.
Once it was powered up, I just needed to do the usual HomeKit pairing process. The setup code is provided both on the back of the printed manual, as with other Eve accessories, and also on the inside of the mount - just in case you really do lose it. The camera connected to the Wi-Fi without issues, and I was up and running on the first try.

Clear printed instructions
Configuration options
Most HomeKit Secure Video cameras don’t provide much configuration themselves as all the smart features and notification settings are handled by the Apple Home app. I’m not going to go into these here, as important as they are, since they are not specific to this camera. You can learn more about those in my comprehensive HomeKit Secure Video guide. I will note that HomeKit Secure Video requires both a home hub in your HomeKit setup, and an iCloud subscription in order to provide recording space.
Eve does offer a number of very useful configuration options for the Eve Outdoor Cam through their own Eve app. This is purely a HomeKit client with some extra Eve device functionality, so you won’t need to sign up for anything, and Eve doesn’t run their own cloud servers at all (apart from firmware updates). Looking in the Eve app I found that I could tailor the motion detection behaviour in a similar way to other Eve motion sensors.
Eve provides a fairly unique option with their motion sensor where you can specify the duration of the ‘Motion Detected’ state. Most motion sensor simply send that motion was detected and then reset, but by specifying a duration we can actually use the ‘Stops Detecting Motion’ trigger in more useful ways.
I could also adjust the sensitivity of the motion detection between Low, Medium, and High. This is good to see as spammy motion detection triggers can overwhelm the home hub when processing video events and cause poor object recognition and recording performance. You might want to turn down the sensitivity if you have small objects like grass or leaves that can blow in the wind to filter some of this noise out. I have some leaves in the frame, but as Medium setting seems to have been fine for capturing everything that matters reliably.
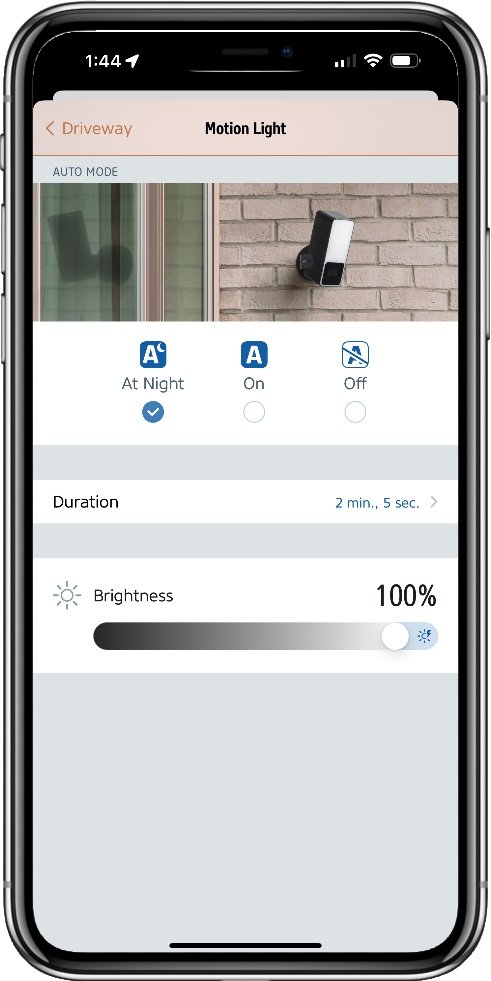
Finally, I could adjust the behavior and brightness of the floodlight. Here I could choose between motion activate at night, motion activated at all times, or keep it off. How long the light stays can be set here. This wasn’t initially clear, but what the setting here does is define how much longer the light stays on after motion stops. If you have motion lighting on, it will remain on so long as motion is detected.
The minimum time is defined by the motion duration I set before. Since I set a motion duration of 5 seconds, and a motion light duration of 2 minutes, it will turn on the light for 2 minutes and 5 seconds minimum. I say minimum because the motion duration will reset each time something moves, so motion will be continuously active until all motion stops, and the light will follow suit.
The Eve app also has an additional ‘Brightness Boost’ function that you can activate manually in the app, or via motion detection. Eve cautions that this causes excess heat build-up so will automatically turn off after 20 seconds. HomeKit doesn’t know about this function - only the normal 0-100% brightness range - so it’s exclusive to the Eve app.

Camera controls in the Eve app

Camera configuration options screen
Details for setting motion light behavior
Real World Performance
A Note About Performance
HomeKit Secure Video is known to be very sensitive to Wi-Fi quality. Many bad experiences come down to less the ideal signal strength or routers that can't cut the mustard. For this test I used an Eero 6 mesh network with a mesh node in the garage, near the camera's installed location, to ensure good signal.
Video and Audio
I’ve been pretty happy with the camera quality here. It’s about as sharp as you could expect from a 1080p stream with good color balance and no serious artifacts. Video capture is smooth, without any audio sync issues, and it handles dynamic range fairly well even though it doesn’t have HDR.
Audio is something I’ve had issues with on other cameras in the past, the best HomeKit audio capture coming from the Logitech Circle View so far. I was pleased to find the audio quality on the Eve Outdoor Cam was up to this standard, if not better. It’s always been clear and noise free but reviewing clips for this review I noticed I could even clearly understand the speech from the teenagers across the street (with the volume up).
Motion detection is rated to around 30ft (9m) depending on mounting height. That’s pretty close to the length of my driveway, and I’ve found it triggers reliably past that. Pre-roll video will kick in, and the recording to iCloud will cover from before motion was detected, which is awesome. Not being battery powered also means the recording can continue as long as necessary to catch everything that happens, so there’s no clip length issues to worry about.

A still from the Eve Outdoor Cam during the day
Night vision
In most cases I expect that the Outdoor Cam would be used with the floodlight functionality as I do, but even with that the low light and night vision performance can still be important. This is because the floodlight doesn’t kick in until the motion detection event, so the pre-roll capture will be night vision only (unless you opt to leave the light on all the time).
The floodlight itself isn’t as bright as a typical security flood. I was running it alongside a Ring Spotlight Cam for a while, and they were comparable in terms of brightness and coverage area. Eve doesn’t provide a brightness figure for the Outdoor Cam, but given Ring’s spec is 750 lumens it would be pretty close to that. An LED security floodlight camera will be in the range of 2000-3000 lumens for reference, depending on brand.
I’ve found the night vision to be fairly good with no blurring of moving people or objects, although my test location is hampered by the close-up foliage reflecting the IR light. Even with that, the visible range is quite extensive, easily outpacing cameras like the Eufycam 2C Pro and Ring’s original Spotlight Cam. You can see what’s going on well enough, but there is some loss of clarity. Once the floodlight kicks in, however, these issues go away. The low light performance is excellent, and the relatively low brightness of the light is adequately compensated for.
In the sample below you can see that the floodlight reaches over most of the driveway. Note the streetlight at the far corner. This does illuminate the bottom corner of the driveway, but not much further, so all of the light in the fore and middle ground is coming from the Eve Cam.

Night vision sample

Flood light sample - 100% brightness
Reliability
Any discussion of reliability for a camera using HomeKit Secure Video must come with some caveats. There are various reasons a camera may show as offline from recalcitrant home hubs to poor network performance. There are some cases where certain cameras do have issues, but in many cases the camera is actually not offline at all and pulling up the live view will make HomeKit realize it’s mistake.
That said, it’s safe to say that I have seen nothing that gives me any reason for concern with the Eve Outdoor Cam. It has, in fact, had fewer false offline notifications than my other cameras and has reliably caught 99% of all motion events on only Medium sensitivity. The odd occasion where it has missed something I can put down to HomeKit failing to record, and not an issue with the camera.
This is an unfortunate reality of HomeKit Secure Video. Although all Wi-Fi security cameras can miss the odd event, HomeKit does sometimes miss-identify an event and not record it. You can mitigate this somewhat by setting a camera to record all motion, but that usually results in a lot of junk recording and spammy notifications.
I’ve ensured that the camera has excellent network connectivity with the placement of a mesh router nearby in the garage, and using a good Wi-Fi system for HomeKit like the Eero 6+. It cannot be understated how important this is to a good experience with HomeKit Secure Video and it might be worth verifying your setup with a cheaper indoor camera first.
The location I have the camera installed is fully exposed to the elements and west facing, so it gets the full afternoon sun. So far, I’ve had no issues with heat or moisture, and that’s after some monster rain events as well.
Alternatives
Logitech Circle View
This HomeKit exclusive camera from Logitech delivers performance on par with the Eve Outdoor Cam has a wider 180-degree field of view and a built-in ambient light sensor for use with automations but lacks the floodlight option. It sports a more compact design that can be used indoors as well as outside and needs to be powered by USB. The hardwired cable gives you about 7 feet before you need an extension.
This is a great camera for most situations, but there are known issues with some mesh routers that might necessitate a workaround.

Netatmo Smart Outdoor
With a similar design and size, Netamo has had a floodlight cam for HomeKit on the market for a number of years. This model features a 105bD siren as well as the features of the Eve Outdoor Cam, but requires signing up to Netatmo’s app, and carries and even higher price tag.
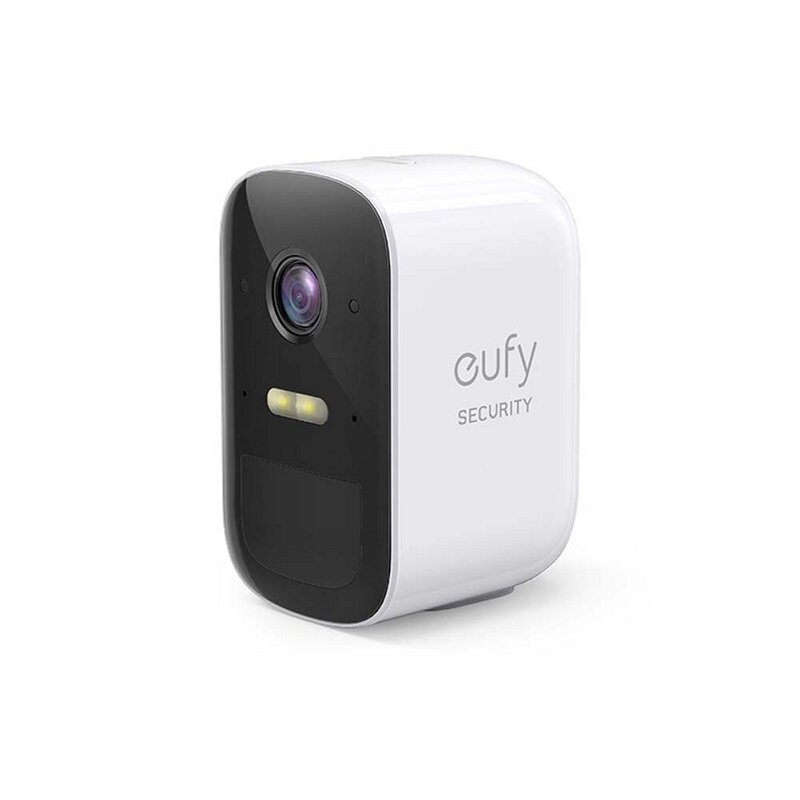
Eufycam 2C
Eufy provides the only real option for a battery or solar powered camera with official HomeKit support. Being battery powered means you lose the pre-roll recording, and I’ve found they take too long to wake up when motion is detected, often missing most of the action.
You’ll also require a Homebase hub to run them, and the included spotlight is fairly weak. Only really an option if you have no way to get any kind of power to the site.
The Verdict
Personally, I’m really impressed with the Eve Outdoor Cam. I’ve struggled to find a workable outdoor camera that I can use with HomeKit Secure Video that I can rely on to do the job. This one has met the bill. You do have to ensure excellent Wi-Fi signal, as with any HomeKit camera, but given that I’ve had excellent performance in terms of motion detection and recording performance, both day and night.
This is a premium grade product with solid build quality, a good camera within HomeKit’s 1080p limitation, and very good audio capture capability. The floodlight is adequate for illuminating the area in front of the camera for moving around, and the low light performance of the camera means it provides ample light for clear, blur-free video recording at night. You have good control of the brightness and duration of the light, and manual control through HomeKit as well.
For me, this is easily the best outdoor camera for HomeKit on the market. Yes, you do pay a premium for it, but you get what you pay for, and it’s not even the most expensive option in this category.